Guide · Assembly Tips
IKEA Furniture Assembly Tips That Save Time, Screws, and Sanity
10 min read · From experienced assemblers
Most mistakes happen in the first 10 minutes — before a single screw is tightened.
The best IKEA furniture assembly tips are to sort all hardware before you start, build on a soft surface, check every panel orientation before locking pieces together, and keep the frame square before fully tightening everything. These four habits alone prevent the majority of mistakes that turn a 45-minute build into a 3-hour one.
These tips come from buyers who have assembled dozens of IKEA pieces and logged their times on FlatPackTime. They are not theoretical — they are the patterns that show up in every frustrating build.
IKEA Assembly Quick Reference
Do these before you touch a single panel
| # | Tip | Saves |
|---|---|---|
| 1 | Sort all hardware by bag number before touching panels | 10–15 min |
| 2 | Read the full manual before starting | 20–30 min |
| 3 | Build on cardboard or carpet — protects panels and knees | scratches |
| 4 | Check every panel orientation before tightening anything | 15–20 min |
| 5 | Hand-tighten first, square the frame, then fully tighten | 30+ min |
| 6 | Cam locks: snug is enough — overtightening strips them | irreversible |
| 7 | Test drawer slides fully before attaching fronts | 20+ min |
| 8 | Keep packaging until the build is confirmed complete | return trip |
1. Sort Every Screw, Dowel, Cam Lock, and Panel Before Starting
Hardware sorting is the single highest-return thing you can do before a build. It takes 5 minutes and saves 20–30 minutes of fumbling during the build itself.
- →Empty every bag and group screws, cam locks, dowels, and brackets into separate piles — use a muffin tin or small bowls.
- →Sort hardware bags by number and keep them in order. IKEA sequences bags to match the steps.
- →Identify similar-looking panels before starting. IKEA often uses parts that look identical but are mirrored — check pre-drilled hole positions.
- →Keep left and right pieces physically separated. Put them on opposite sides of the room if needed.
- →Match part letters in the manual to the stickers on panels before the build starts, not during it.
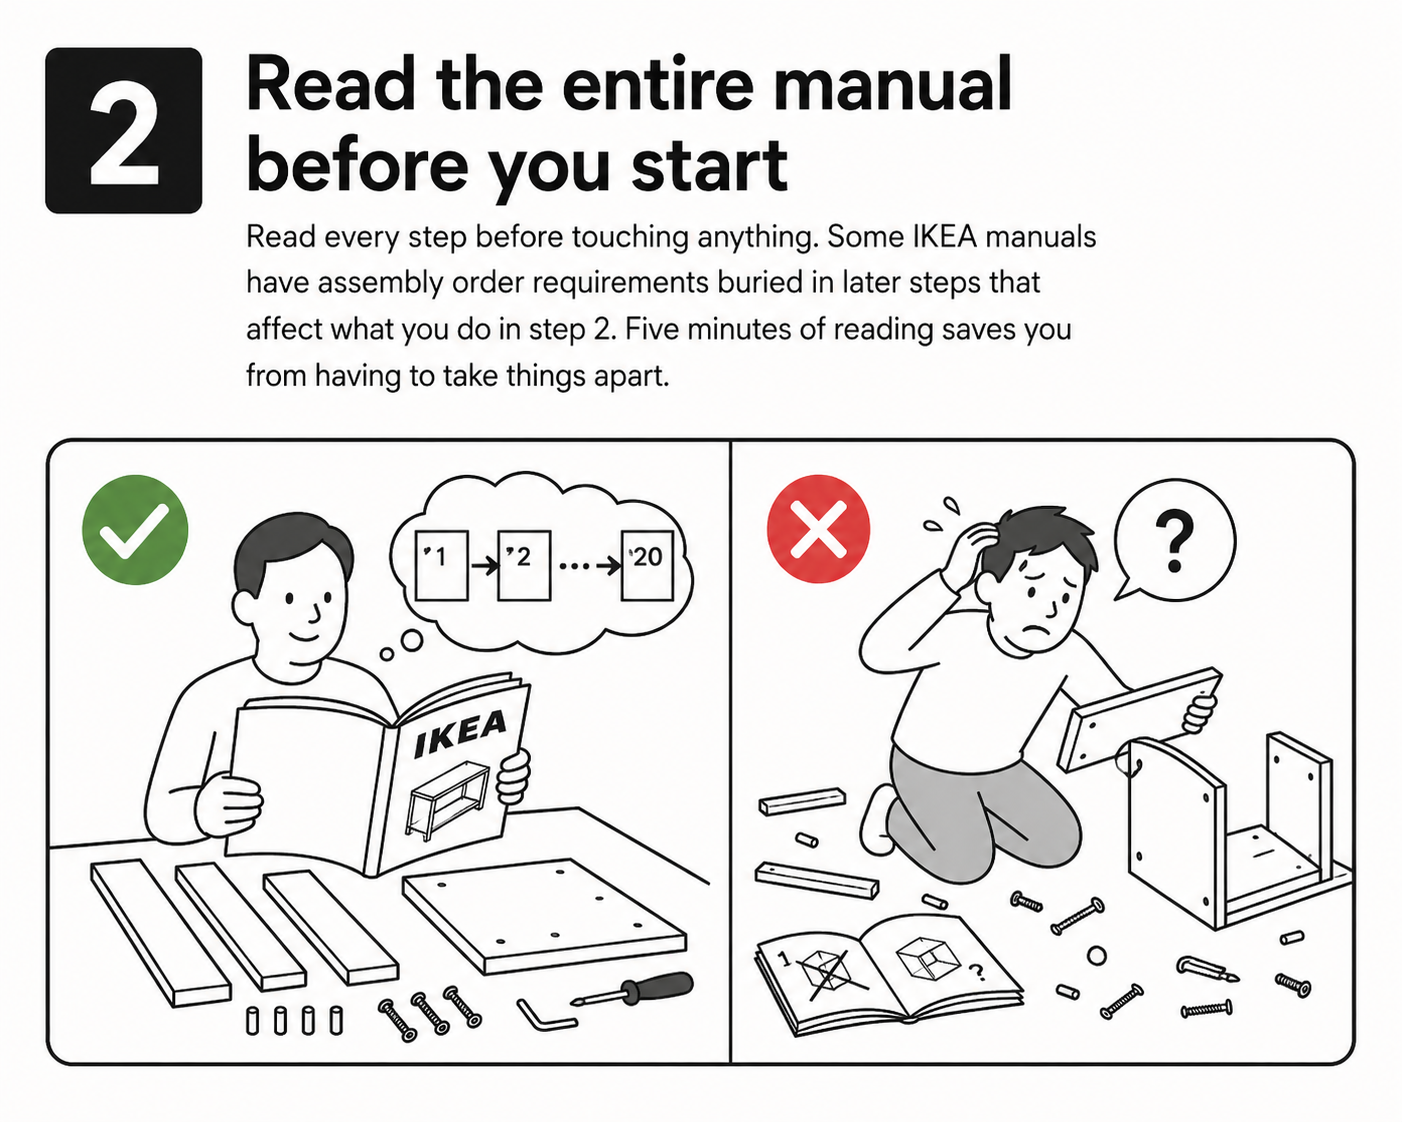
2. Read Ahead Before Step 1
Scan the entire manual before touching anything. Some IKEA manuals have assembly order requirements buried in later steps that affect what you do in step 2. Five minutes of reading prevents an hour of taking things apart.
- →Check the box count before opening anything — large items like PAX ship in multiple boxes. Do not start until all boxes are present.
- →Inspect corners and edges before unpacking. If a box looks crushed, photograph it before opening in case parts are damaged.
- →Clear a full floor space before removing any panels. You need room to lay pieces flat and walk around all sides.
- →Check the parts list on the first page and count every part before starting. Discovering a missing cam lock at step 18 is avoidable.
3. Do Not Overtighten Cam Locks
Cam locks are easy to over-tighten, and once stripped they cannot be un-stripped. Stop when the cam feels snug and the joint is pulled tight — you should feel firm resistance, not a hard stop.
- →Cam locks turn about 180 degrees from open to locked. The slot points toward the bolt when locked — use that as your visual cue, not torque.
- →If a cam lock turns but feels loose, it is likely already stripped. Continuing to tighten will not help.
- →Dowels should be pressed in firmly with a rubber mallet — not hammered hard. Stop when fully seated and flush.
- →Dowels in particleboard can split the material if forced in at an angle. Start them straight before applying any pressure.
4. Check Finished Edges Before Locking Panels Together
The most common IKEA mistake — by a wide margin — is inserting a panel in the wrong orientation. Both faces of a panel can look nearly identical until you look closely.
What to check before every panel goes in:
- •The finished face (smooth, laminated) should face outward — toward you when the piece is in use.
- •The raw MDF or particleboard backside is rough and unfinished. If that texture is visible on a finished surface, the panel is backwards.
- •Drawer units, wardrobes, TV stands, and desks are where this happens most — they have multiple similar panels.
- •Check that pre-drilled hole positions match the manual diagram before tightening anything.
5. Build on Cardboard, Carpet, or a Blanket
IKEA panels are laminated over particleboard. Hard floors scratch and chip that surface easily — and scratches on finished faces are permanent. Building on a soft surface protects the furniture and is easier on your knees for a long build.
- →A flattened cardboard box works perfectly — use the packaging the furniture came in.
- →Moving blankets or thick rugs work well for large builds like PAX or HEMNES.
- →Never drag panels across a hard floor, even a few inches — the edge laminate chips easily.
- →Keep any tools off the surface when you are not using them. A screwdriver slid under a panel will mark the finish.
6. Keep the Frame Square Before Nailing the Back Panel
Hand-tighten all cam bolts and screws first. Get every joint connected and every panel in position. Then check that the frame is square by measuring corner to corner diagonally — both measurements must match. Only then do a final tightening pass.
The back panel or cross brace is what locks squareness in permanently. Insert it before fully tightening anything. Tightening as you go means that by the time you realize the frame is skewed, loosening and adjusting requires undoing multiple bolts.
7. Use Two People for Large Wardrobes, Beds, and Tall Storage
IKEA designs most furniture for two assemblers. That does not mean you cannot do it solo — but for certain pieces a second person adds meaningful safety and cuts time significantly.
8. Anchor Tall Furniture to the Wall
IKEA includes wall anchor hardware with most tall products for a reason. A loaded 4×4 KALLAX or tall BILLY can tip forward when a child pulls on a shelf — and wall anchoring takes less than 10 minutes.
- →Find a wall stud before drilling — the anchor is only as strong as what it goes into.
- →Use the anti-tip strap IKEA includes. It is not optional if you have children or pets.
- →For concrete or tile walls, use an appropriate masonry anchor — the included ones are designed for drywall and studs.
- →Check the anchor placement matches the pre-drilled hole on the furniture before committing to a wall position.
The right tools cut assembly time nearly in half.
9. Be Careful Using a Drill
An electric screwdriver cuts assembly time nearly in half on builds with 20+ screws. But it also strips cam locks, splits particleboard, and sinks screws too deep in about two seconds at the wrong setting.
- →Start at the lowest torque setting and increase only if needed — most IKEA fasteners need far less torque than you expect.
- →Finish the last quarter-turn of every cam bolt by hand. Drills cannot feel the snug point.
- →Never use a drill on wooden dowels — they split. Use a rubber mallet instead.
- →For small screws in the back panel or drawer hardware, a hand screwdriver is safer and gives you more control.
10. Stop If Holes Do Not Line Up
If two holes are not aligning, the most common reason is a panel in the wrong orientation or a step done out of sequence. Forcing misaligned holes with more pressure damages the particleboard around the hole permanently and makes the joint weaker.
- →Put the tool down. Check the panel orientation against the manual diagram.
- →Check whether an earlier step was skipped — IKEA builds are sequence-dependent.
- →If you are one step ahead in the manual and something does not fit, go back and check step order.
- →If holes are close but not quite aligned, check that all previously installed cam locks are fully tightened — a loose joint earlier can shift alignment downstream.
11. Keep Kids and Pets Away From Loose Hardware
Cam bolts, dowels, and small screws are serious choking hazards. Hardware sorting is safer done before kids are in the room, and sorted hardware is easier to work with.
- →Keep hardware bags sealed until the step that uses them — loose hardware on the floor disappears fast.
- →Any hardware left over at the end of a build should be bagged and stored with the furniture manual.
- →Large panels leaning against walls can fall — keep the assembly area clear of anyone not helping.
- →Flat-pack cardboard has sharp edges and staples. Break it down and remove it before kids or pets enter the space.
12. Take Extra Time With Drawers, Hinges, and Doors
Drawer slides and door hinges are where most of the lasting annoyance comes from in a bad build. Spending 10 extra minutes getting these right saves years of stuck drawers and crooked doors.
- →Left and right slides look identical but are not always interchangeable — check the manual for front/back orientation.
- →Install both slides at the exact same height. A millimeter of difference makes a drawer sit visibly crooked.
- →Build and test the first drawer completely before building the rest. If the slide alignment is wrong, fix it on the first one.
- →Do not tighten slide mounting screws until the drawer runs smoothly through its full range of motion.
- →Door hinges have a 3-axis adjustment — side-to-side, in-out depth, and height. Adjust all three before declaring a door aligned.
13. Use a Level for Wall-Mounted Units
Wall-mounted IKEA storage — EKET, BESTÅ wall units, PAX hanging rails — requires a level rail or anchor point. A rail that is even 3mm off horizontal shows clearly once the cabinets or doors are on it.
- →Use a physical spirit level, not a phone app — apps pick up table vibration and are less accurate for drilling.
- →Mark the stud positions before holding the rail up. Find studs first, then determine the rail height.
- →Check level after drilling the first hole and before drilling the second — walls are not always plumb.
- →For EKET, the hanging rail determines the position of every cabinet. Getting it level is the entire job.
14. Do Not Throw Away Packaging Until the Build Is Complete
The most avoidable mid-build problem is discovering a missing part after the packaging is in the bin. Keep all boxes and bags until the build is finished, the hardware is confirmed, and every door, drawer, and hinge works correctly.
- →Keep packaging bags — parts sometimes nest inside the bag folds.
- →IKEA will replace missing parts for free if you have the article number from the box.
- →Leftover hardware is normal — keep it bagged with the manual in case it is needed for future adjustments.
15. Build in the Room Where the Furniture Will Stay
Large IKEA furniture is far harder to move assembled than flat-packed. Carrying a finished 4×4 KALLAX through a doorway or up a stairwell is a common and entirely avoidable mistake.
- →Measure the doorway, stairwell, and final position before starting. PAX wardrobes and large BESTÅ units regularly fail to clear standard doorways assembled.
- →Check ceiling height for tall units — especially near sloped ceilings in attic rooms or stairwells.
- →If you must assemble elsewhere, leave one side panel unattached until the frame is in position.
- →Wall anchoring requires wall access from the start — plan furniture placement before the first cam lock is turned.
16. When to Hire IKEA Assembly Help
Assembly help is not just for people who cannot do it — it is for people who value their time, have back problems, or are dealing with a build that genuinely benefits from a professional. See what your specific build takes on FlatPackTime before deciding.
- →You have limited time and a complex build — PAX wardrobes, HEMNES daybeds, large BESTÅ configurations.
- →The furniture requires wall mounting and you are not confident in your wall anchoring.
- →The piece needs to be moved, disassembled, and reassembled — a professional does this without damaging joints.
- →You are assembling expensive or delicate furniture where a mistake would be costly.
- →You are assembling multiple pieces — batch assembly with help is much faster than solo builds.
17. Search Your Exact IKEA Item Before Starting
Knowing your actual build time before you start is one of the most practical things you can do. Starting a 4-hour PAX build at 8pm is a mistake you only make once. Here are typical times by product:
Times above are approximate. For real buyer data on your specific product, search FlatPackTime — 3,400+ IKEA products with logged assembly times. You can also see which IKEA furniture is hardest to assemble.
Common IKEA Assembly Mistakes at a Glance
🛒 The essential IKEA toolkit
FlatPackTime earns a small commission on purchases — at no extra cost to you.
Frequently Asked Questions
What is the best IKEA assembly tip?+
Sort all parts and hardware before starting, build on a soft surface, check panel orientation before locking pieces together, and avoid fully tightening everything until the frame is square.
Should I use a drill to assemble IKEA furniture?+
Use a drill carefully and only when appropriate. Set it to the lowest torque setting. Hand tools are safer for cam locks, small screws, and delicate panels. Finish the last quarter-turn by hand to avoid stripping.
Can one person assemble IKEA furniture?+
Many small IKEA items can be assembled by one person, but large wardrobes, beds, tall shelves, and wall-mounted units are easier and safer with two people.
How long does IKEA furniture take to assemble?+
It depends on the product. A LACK side table takes 15–20 minutes. A BILLY bookcase runs 30–45 minutes. A MALM bed frame takes 60–90 minutes. A PAX wardrobe with doors can take 3–5 hours. Look up your specific product at FlatPackTime.com for real buyer assembly times.
What IKEA furniture is hardest to assemble?+
PAX wardrobes, HEMNES daybeds, FRIHETEN sofa-beds, and large BESTÅ configurations are consistently rated hardest. PAX in particular requires two people, wall anchoring, and careful door alignment — it is a full-day project for most people.
What tools do I need for IKEA assembly?+
The minimum: a flathead screwdriver, a Phillips screwdriver, and the Allen key IKEA includes. What actually makes it faster: an electric screwdriver on low torque, magnetic bit set, rubber mallet, bubble level, and knee pads for longer builds.
Should IKEA furniture be attached to the wall?+
Yes, for anything tall or freestanding that could tip — wardrobes, tall bookcases, and large shelving units. IKEA includes wall anchor hardware with most products that need it. This is especially important in households with children or pets.
Why is IKEA furniture hard to assemble?+
IKEA furniture is sequence-dependent, not technically hard. Steps that look simple can make later steps much harder if done out of order or with the wrong panel orientation. Wardrobe and storage builds are the most demanding because of hardware density and wall-anchoring requirements.
Want to know how long your IKEA build will take?
Search your exact item free on FlatPackTime — real buyers have logged assembly times for 3,400+ IKEA products.
Search your IKEA product →