BRIMNES 3-drawer dresser, black, 30 3/4x18 1/8x37 3/8 "
IKEA
Real buyers report about 1 hour and 35 minutes to assemble the BRIMNES 3-drawer dresser, black, 30 3/4x18 1/8x37 3/8 ". It's manageable for most people — can be done solo. The drawer slide installation is where the time goes: each pair needs to be level, and rushing this step means stiff drawers that are annoying to fix after the fact.
All times on this page come from real buyers who logged their actual build time after finishing — not IKEA estimates.
Like most IKEA furniture, the real time is longer than what the instruction booklet implies. The 1h 35m average here comes from buyers who logged their actual build — not the manufacturer's estimate.
A moderately demanding build that benefits from two people on some steps. Experienced builders can handle it solo, but it's slower alone.
Drawer units are fragile to disassemble.
MDF edges and screw holes wear out quickly on repeated assembly. Cam locks can also seize up. Go slow and use hand tools — power tools strip these holes fast.
Read: 10 IKEA disassembly mistakes to avoid →Why this build takes about 1h 35m
- —Drawer slide rails must be level — even slight misalignment causes stiff or stuck drawers
- —Drawer fronts are adjusted individually after installation, which takes more passes than expected
- —Each drawer should be fully installed and tested before moving to the next
First-timer estimate: 1h 59m–2h 18m — budget this before you start
Just assembled this? Log your time
Log your assembly time
How long did it take you? Help future buyers plan.
Community reviews (1)
💬 Estimated from YouTube tutorials (9 videos)
New to IKEA builds?
Before you open the box, read our IKEA assembly tips to avoid backwards panels, stripped screws, drawer mistakes, and wasted time.
Related assembly times
For assemblers
Need cash? Get paid to assemble furniture.
People pay every day for help building desks, shelves, beds, dressers, and IKEA-style furniture. If you're handy, this can be a simple way to make extra money on your own schedule.
Start earning on Taskrabbit →FlatPackTime may earn a commission if you sign up through this link.
🛒 Tools you'll need
Speed up your build — these are the most common tools IKEA assemblers reach for.
FlatPackTime earns a small commission on purchases — at no extra cost to you.
Don't want to spend about 1 hour and 35 minutes building the BRIMNES 3-drawer dresser, black, 30 3/4x18 1/8x37 3/8 "?
Get matched with a local assembler
Tell us a bit about your BRIMNES 3-drawer dresser, black, 30 3/4x18 1/8x37 3/8 " project and we'll connect you with someone nearby.
BRIMNES 3-drawer dresser, black, 30 3/4x18 1/8x37 3/8 " — Assembly Overview
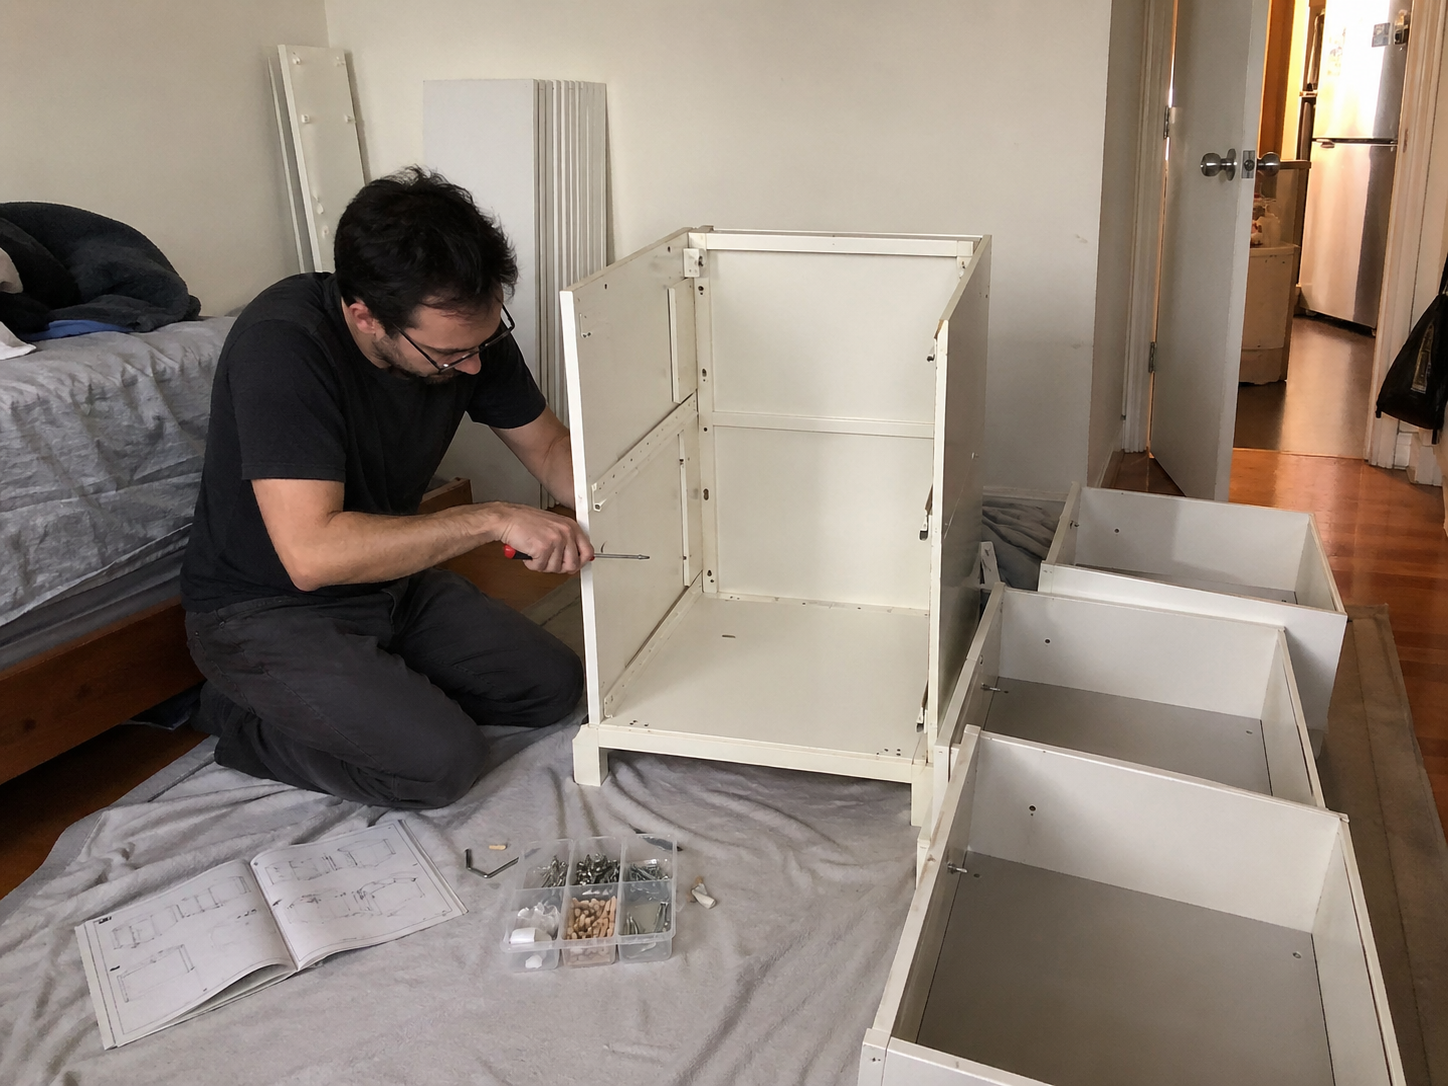
Drawer units look simple on the outside, but the internal hardware tells a different story. The BRIMNES 3-drawer dresser, black, 30 3/4x18 1/8x37 3/8 " takes an average of 1 hour and 35 minutes to assemble according to 2 buyers, rated moderate in difficulty. With 3 drawers, the slide installation is the most time-consuming step — each pair needs to be level and aligned. Done right, you end up with a unit that opens smoothly for years.
Why this build takes as long as it does
Drawer slide installation is where most of the time goes on this build. Each slide needs to be mounted level relative to the others, so test each drawer fully before installing the next. The drawer fronts are the last step — attach them loosely, align visually, then tighten. Trying to align the front while the slides are off is a frustrating loop most first-time builders fall into.
⏱ Time Breakdown
Estimated split based on how real builds typically run
What usually slows people down
- !Getting drawer slide rails level — the drawers will stick if they're even slightly off
- !Attaching drawer fronts before testing that each drawer runs smoothly
- !Mixing up similar-looking hardware across different drawers
- !Pulling fronts off to realign after they've been attached — it's inevitable if slides aren't checked first
🛠 How to Assemble It Faster
- 1Treat the 3 drawers like an assembly line: install slide hardware on one side of every drawer box, flip them all, do the other side. Noticeably faster than one-drawer-at-a-time.
- 2Install ALL slide rails into the carcass before building a single drawer. Test that they're level relative to each other first — fix alignment now, not after the drawers are built.
- 3Attach drawer fronts last, screws loose. Align visually with drawers closed, then tighten. You won't get this right on the first try — and that's normal.
- 4Mark the first completed drawer with tape on the inside — easy to lose track of which ones have been tested after building several.
Drawer Assembly Tip
Common mistake: Building drawers one at a time exactly as the manual shows can slow you down significantly. A better approach is to line up all the drawer pieces and work through one step across all of them before moving to the next — install slides on one side of every drawer, then flip and repeat. It's faster, more consistent, and easier to manage solo.
Step-by-Step Assembly Guide
- 1Assemble the outer carcass first — sides, top, bottom, and back panel.
- 2Install drawer slide rails into the carcass. Check they're level side-to-side before tightening.
- 3Build the first drawer box. Slide it in and test the full range of motion before building others.
- 4Adjust slide rail height until the drawer face sits flush, then install remaining drawers.
- 5Attach drawer fronts. Start with screws loose, align the front visually, then tighten.
- 6Install any locks, handles, or soft-close bumpers last.
🛒 Tools that make this build easier
Recommended based on this product type
FlatPackTime earns a small commission on purchases — at no extra cost to you.
Common mistakes to avoid
- ✕Attaching drawer fronts before confirming each drawer runs smooth — removing fronts is annoying to redo
- ✕Mixing slide hardware between different drawers — slides are often identical but position-specific
- ✕Mounting all slides before testing the first drawer — a systematic error gets repeated across all drawers
- ✕Not testing soft-close bumpers before final installation
Frequently Asked Questions
How long does the BRIMNES 3-drawer dresser, black, 30 3/4x18 1/8x37 3/8 " take to assemble?
Based on 2 real buyers who logged their build on FlatPackTime, the BRIMNES 3-drawer dresser, black, 30 3/4x18 1/8x37 3/8 " takes an average of 1 hour and 35 minutes to assemble. First-time assemblers typically take 20–40% longer than experienced builders, especially if they don't sort hardware before starting.
Can I assemble the BRIMNES 3-drawer dresser, black, 30 3/4x18 1/8x37 3/8 " alone?
Yes — the BRIMNES 3-drawer dresser, black, 30 3/4x18 1/8x37 3/8 " is rated moderate and most buyers complete it solo. Having a second person speeds things up, but it's not required for this build.
What tools do I need to assemble the BRIMNES 3-drawer dresser, black, 30 3/4x18 1/8x37 3/8 "?
IKEA includes an allen key with the BRIMNES 3-drawer dresser, black, 30 3/4x18 1/8x37 3/8 ", but an electric screwdriver is the single biggest time-saver. A rubber mallet helps seat dowels without marking the wood, and a bubble level catches alignment issues early. For a build this size, having all three tools ready before you start makes a real difference.
Is the BRIMNES 3-drawer dresser, black, 30 3/4x18 1/8x37 3/8 " worth assembling yourself?
At IKEA's price point, self-assembly is usually the practical choice. The BRIMNES 3-drawer dresser, black, 30 3/4x18 1/8x37 3/8 " is rated moderate — manageable for most people with a bit of patience.
Why do my BRIMNES 3-drawer dresser, black, 30 3/4x18 1/8x37 3/8 " drawers stick or drag?
Sticking drawers almost always mean the slide rails are slightly misaligned. Loosen the mounting screws on the slides, adjust until the drawer runs smooth with no resistance, then re-tighten. Sometimes the drawer box itself is slightly out of square — check the box first by pushing the corners gently and see if it flexes.
Can I add dividers or organizers to the BRIMNES 3-drawer dresser, black, 30 3/4x18 1/8x37 3/8 "?
IKEA sells compatible drawer dividers and organizers for most BRIMNES units. Check the IKEA website for accessories listed as compatible with your specific model — they're designed to fit exactly. Third-party organizers that fit your drawer dimensions also work well.
Compared to similar IKEA builds
Easier alternatives to consider
If you want less assembly time or complexity
If you prefer IKEA's design and price point, the original is still a solid choice — just budget the extra setup time.
What affects assembly time
Is this worth assembling yourself?
Yes — this is well within DIY range for most people. The main risk is the drawer slide or slat alignment taking longer than expected on your first attempt. Budget the time, have a rubber mallet ready, and don't rush the alignment steps. Professional assembly for a build like this isn't necessary unless you're genuinely short on time.
- ✓An afternoon free
- ✓An electric screwdriver
- ✓Basic IKEA experience
- ✕First IKEA build ever
- ✕No time to spare
- ✕Back or mobility issues