STACKSTOD Desk organizer, gray-blue, 12 ½x7x6 ¼ "
IKEA

Assembly time for the STACKSTOD Desk organizer, gray-blue, 12 ½x7x6 ¼ " hasn't been logged yet on FlatPackTime. Based on similar products, budget 1–2 hours and read the manual in full before starting.
All times on this page come from real buyers who logged their actual build time after finishing — not IKEA estimates.
IKEA's instruction manuals consistently underestimate assembly time — especially for first-time builders. Whatever estimate you've seen, budget 20–30% more.
Desks are a moderate build. The cross-bracing and any drawer unit are where most people spend extra time.
Watch the back panel before you nail anything.
Thin MDF back panels are easy to install the wrong way — and once nailed in, they rarely come out clean. Dry-fit the panel first, confirm orientation, then nail.
Read: 10 IKEA disassembly mistakes to avoid →Why this build takes about 1h
- —Cross-brace must be fully seated — half-installing it causes permanent wobble in the finished desk
- —Drawer units should be built and slide-tested before being attached to the desktop
- —Tabletop alignment requires fine adjustment before any fasteners are fully tightened
First-timer estimate: 1h 15m–1h 27m — a bit more than the avg
Just assembled this? Log your time
Log your assembly time
How long did it take you? Help future buyers plan.
New to IKEA builds?
Before you open the box, read our IKEA assembly tips to avoid backwards panels, stripped screws, drawer mistakes, and wasted time.
Related assembly times
For assemblers
Need cash? Get paid to assemble furniture.
People pay every day for help building desks, shelves, beds, dressers, and IKEA-style furniture. If you're handy, this can be a simple way to make extra money on your own schedule.
Start earning on Taskrabbit →FlatPackTime may earn a commission if you sign up through this link.
🛒 Tools you'll need
Speed up your build — these are the most common tools IKEA assemblers reach for.
FlatPackTime earns a small commission on purchases — at no extra cost to you.
Don't want to spend about 1 hour building the STACKSTOD Desk organizer, gray-blue, 12 ½x7x6 ¼ "?
Get matched with a local assembler
Tell us a bit about your STACKSTOD Desk organizer, gray-blue, 12 ½x7x6 ¼ " project and we'll connect you with someone nearby.
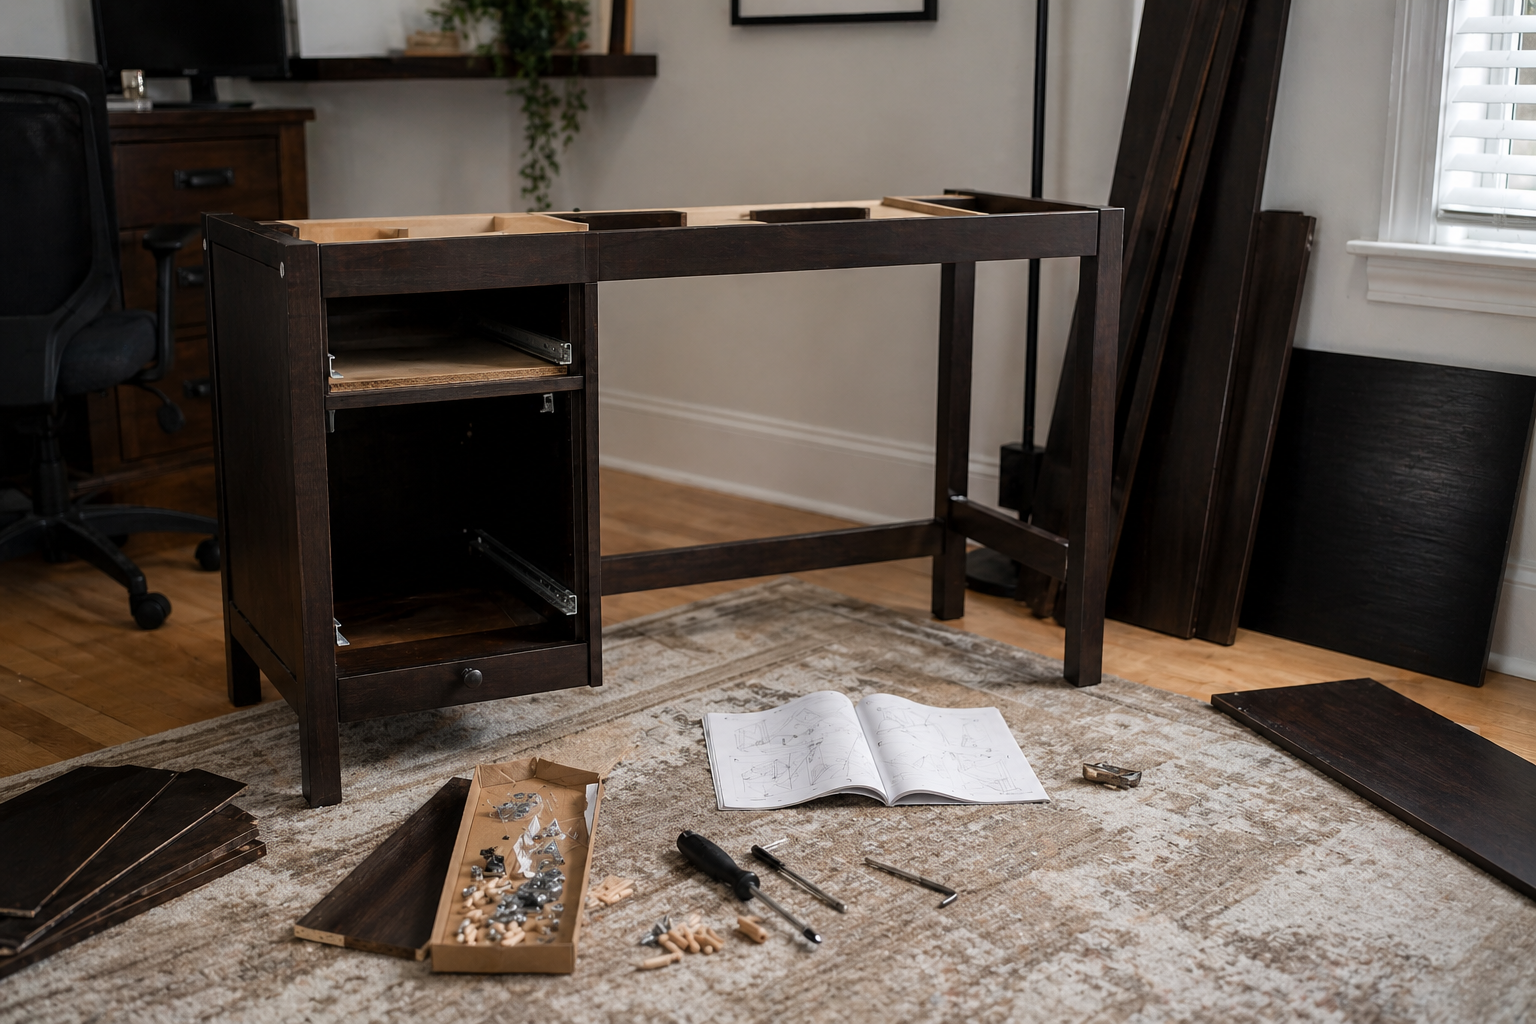
STACKSTOD Desk organizer, gray-blue, 12 ½x7x6 ¼ " — Assembly Overview
A home office setup lives and dies by the desk, and the STACKSTOD Desk organizer, gray-blue, 12 ½x7x6 ¼ " is built to work hard. Based on 1 assembly log from real buyers, expect around 1 hour to put it together — rated very easy in difficulty. Desk builds typically involve more fasteners than they appear to, but the payoff is a workspace that holds up for years. Give yourself a full afternoon and you won't feel rushed.
Why this build takes as long as it does
Desk builds look simpler than they are because the final product is compact, but the internal structure has more hardware than it appears. Cross-bracing is usually the most important step: it's easy to skip or half-install, and the desk will wobble for years if it's not seated correctly. If the desk includes a drawer unit, that's a separate sub-assembly that needs to be completed and tested before attaching to the frame.
⏱ Time Breakdown
Estimated split based on how real builds typically run
What usually slows people down
- !Cross-brace installation — it's easy to half-seat it, and the desk will wobble permanently if not locked in fully
- !Attaching the top to the frame while keeping it flush on all edges
- !Cable management — usually an afterthought but takes significant time to do cleanly
- !Checking for wobble and adjusting leg levelers after the desk is flipped upright
🛠 How to Assemble It Faster
- 1Build the cross-brace as the very first structural step — it's much easier to seat correctly before legs have any weight on them.
- 2If the desk includes a drawer unit, build and test it completely before attaching to the top. Removing it after is a pain.
- 3Install cable clips or grommets before the desk is against the wall. They're impossible to reach once it's in position.
- 4Use a low-torque power drill for cam bolts — switch to hand-tightening for the last quarter turn to avoid stripping.
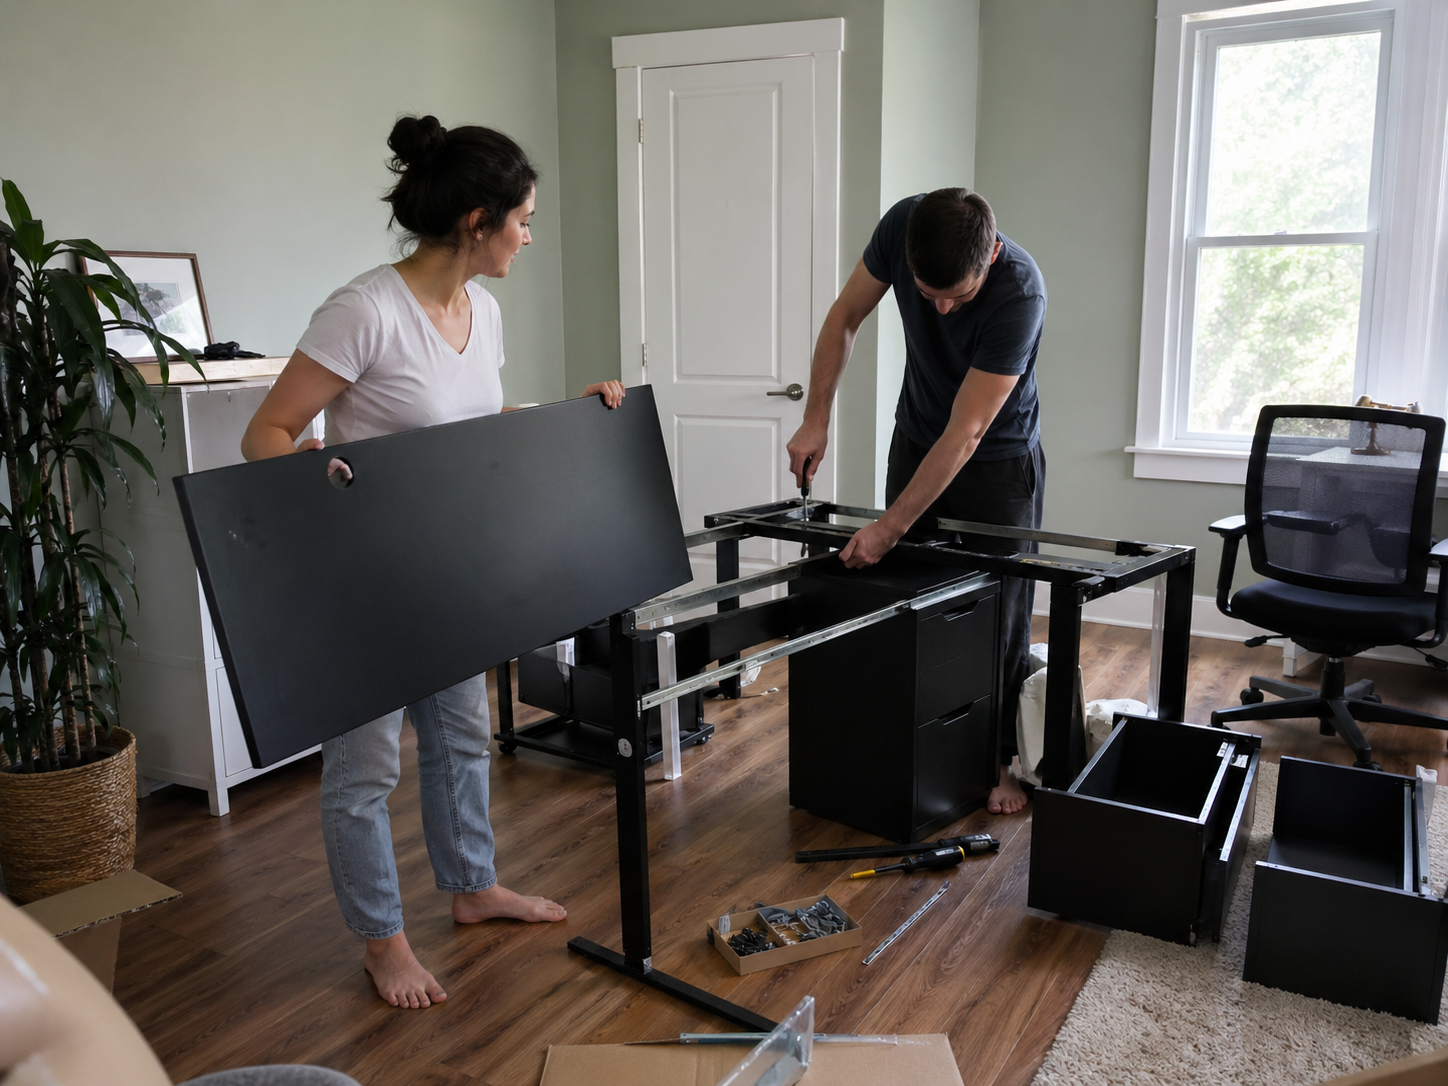
Step-by-Step Assembly Guide
- 1Assemble the leg structure or frame first while everything is flat and accessible.
- 2Attach any cross-bracing or support rails. These make the desk rigid — don't skip or half-install.
- 3If the desk has drawers, build the drawer carcase and install slides before attaching to the top.
- 4Attach the tabletop to the frame. Work from one end, aligning carefully before tightening.
- 5Install any cable management clips or grommets included.
- 6Flip the desk upright carefully. Check for wobble and adjust leg levelers if present.
- 7Attach any modesty panels or shelving add-ons last.
🛒 Tools that make this build easier
Recommended based on this product type
FlatPackTime earns a small commission on purchases — at no extra cost to you.
Common mistakes to avoid
- ✕Not fully seating the cross-brace — it looks attached but wobbles under load
- ✕Attaching the tabletop before the leg assembly is confirmed square
- ✕Forgetting to install cable management clips before the desk is against the wall
- ✕Skipping the leg leveler adjustment on slightly uneven floors
Frequently Asked Questions
How long does the STACKSTOD Desk organizer, gray-blue, 12 ½x7x6 ¼ " take to assemble?
Based on 1 real buyer who logged their build on FlatPackTime, the STACKSTOD Desk organizer, gray-blue, 12 ½x7x6 ¼ " takes an average of 1 hour to assemble. First-time assemblers typically take 20–40% longer than experienced builders, especially if they don't sort hardware before starting.
Can I assemble the STACKSTOD Desk organizer, gray-blue, 12 ½x7x6 ¼ " alone?
Yes — the STACKSTOD Desk organizer, gray-blue, 12 ½x7x6 ¼ " is rated very easy and most buyers complete it solo. Having a second person speeds things up, but it's not required for this build.
What tools do I need to assemble the STACKSTOD Desk organizer, gray-blue, 12 ½x7x6 ¼ "?
IKEA includes an allen key with the STACKSTOD Desk organizer, gray-blue, 12 ½x7x6 ¼ ", but an electric screwdriver is the single biggest time-saver. A rubber mallet helps seat dowels without marking the wood, and a bubble level catches alignment issues early. For a build this size, having all three tools ready before you start makes a real difference.
Is the STACKSTOD Desk organizer, gray-blue, 12 ½x7x6 ¼ " worth assembling yourself?
At IKEA's price point, self-assembly is usually the practical choice. The STACKSTOD Desk organizer, gray-blue, 12 ½x7x6 ¼ " is rated very easy — most first-timers complete it without issue.
Can I route cables through the STACKSTOD Desk organizer, gray-blue, 12 ½x7x6 ¼ "?
Many IKEA desks include cable management holes or clips. Check your specific instruction manual — if not included, third-party cable clips that clamp to the desk edge work well without drilling. Running cables through the frame (rather than behind the desk) makes the workspace much cleaner.
How do I stop the STACKSTOD Desk organizer, gray-blue, 12 ½x7x6 ¼ " from wobbling?
Wobble almost always means the cross-bracing isn't fully seated, or one or more leg bolt isn't fully tightened. Fully tighten all hardware and confirm the cross-brace is locked into its socket. If the wobble persists, check that the floor is level — leg levelers can compensate for an uneven surface.
Compared to similar IKEA builds
Easier alternatives to consider
If you want less assembly time or complexity
If you prefer IKEA's design and price point, the original is still a solid choice — just budget the extra setup time.
What affects assembly time
Is this worth assembling yourself?
Yes — this is a reasonable DIY project. The main variable is how much IKEA furniture you've assembled before. First-timers should budget extra time and read the full manual before starting. An electric screwdriver turns a frustrating build into a manageable one.
- ✓An afternoon free
- ✓An electric screwdriver
- ✓Basic IKEA experience
- ✕First IKEA build ever
- ✕No time to spare
- ✕Back or mobility issues